Are you looking for the new version of this page: Stats
"Stats (Legacy)" is using information from the Legacy version of the game (v0.0.2.2b). The information here is from an older version of the game before the most recent gameplay changes.
Stats are different values for employees and Abnormalities, that has different effects and functions in the game, like limitations, productivity, strength, and more. These statistics, although minor numerically, are very important to consider when playing, because usually, the things that go wrong are a miscalculation on the player's part through sending a certain employee to the wrong place.
Employees[]
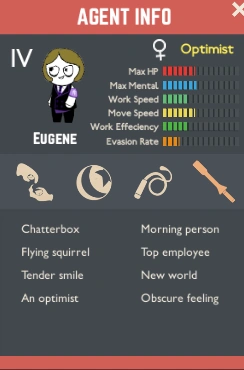
Agent's Info
The employees has a different list of stats. The 'Basic Stats', which can be seen in the agent's info when clicking them, are defined in 8 types: Level, Life Style, Health, Mental Gauge, Work Speed, Move Speed, Work Efficiency and Evasion Rate. When 'Suppressing', there are 2 more types: Damage and Armor. Traits can buff or debuff the basic stats of the agents. Equipment changes the values of the agent's Damage and Armor.
Level (I, II, III, IV, Other Roman Numerals)[]
Level will define the basic values for the other stats (HP, Mental, Work Speed, Move Speed, Work Efficiency and Evasion Rate). The new hired agents will start at level 1 and the maximum level is 5. The agents will be promoted when they have enough experience (See below) and they can only be promoted at the end of the day. When hiring a special Agent, the player can choose which level they will start. The higher the level, the higher the price.
Experience[]
Experience is a hidden value of the agents, which can be increased with the Manual Distribution Research. The agents gain experience when performing works. When an agent have enough experience after performing a specific amount of works, it will be promoted if isn't at the Max Level. Agents can only be promoted at the end of the day.
Life Style[]
The Life Style can increase or decrease the rate of 3 stats of an agent: Working Speed, Efficiency and Avoidance Rate, depending of its Life Style. This increase or decrease in percentage the values of the traits that the agent will gain.
Health[]
Health, Max Health or Max HP, is the amount of Physical Damage that the employee can take before reaching zero. When this bar is depleted, the employee dies. This value is present as 'Max Health' in the Agent Info. The player can't see the actual bar until they unlocks the Information Team department. Once done, a red gauge will appear above the agents, representing their current health and separating them in bars. The same bar can be see when selecting them for a work.
Employees recover Health when standby in the main department room. The amount of recovery vary depending of their Max Health and the recovery rate. If all the agents dies, the game must be restarted from a previous checkpoint.
Mental Gauge[]
The Mental Gauge or Max Mental, is the amount Psychological Damage that the employee can take before reaching zero. When this gauge is depleted, the employee enter into a panicked state, according under a panic response and unable to be controlled. Other agents must suppress the panicked employees to avoid casualties of killing themselves or other employees, or panicking more employees with their presence. When an employee lose all its mental gauge while working with an Abnormality, other effects may occur instead panicking. Example: Nothing There instantly killing a panicked agent in its containment room, Alriune dealing psychological damage to employees, but sleeping them when their mental gauge is depleted.
The player can't see this gauge until they unlocks the Information Team department. Once done, a light blue circular gauge will appear above the agents, to the left side of the Health Bar. When selecting an agent to work, the mental gauge will be occupying an square, including the level of the agent; colored by the current amount of mental gauge left. When the agents suffer psychological damage, the gauge will turn darker. Once it is completely pitch black, the agent will panic. Their 'Max Mental' is presented in their Agent Info.
Employees recover Mental Gauge when standby in the main department room. The amount of recovery vary depending of their Max Mental Gauge and the recovery rate. If all the agents are panicked, the game must be restarted from a previous checkpoint.
Work Speed[]
Work Speed is how fast the agent will complete or fill the work gauge when working with an Abnormality. This increase the speed that an agent works, but doesn't increase the efficiency of the agent, this mean that it will get 'Failure Blocks' more quickly too. This stat can be see in the Agent Info.
Move Speed[]
Move Speed is how fast an agent can move through the facility, the hallways and other rooms; to reach faster its location. This value can be increased by traits, but can be reduced by other things, like when having equipped a shield or when walking on the vines of Snow White's Apple.
Work Efficiency[]
Work Efficiency increase the work's success of the agent when performing any work with an Abnormality. This increase the chances of 'Success Blocks' in the work gauge and will reduce the probability of 'Failure Blocks'. As more 'Success Blocks' are at the end of the work, the change of the Abnormality's mood will be higher. This stat doesn't seem to affect the Success Chance of Observations.
Evasion Rate[]
Evasion Rate or Avoidance Rate, increase the chances of avoiding damage that will occur when the agent fail while working. This value doesn't apply when suppressing a breaching Abnormality.
Damage[]
The Damage's value is the amount of 'Damage' than an agent can deal when suppressing Abnormalities or panicked employees. This value is calculated by the weapon that the agent is currently using and any other upgrades of that weapon. With more damage, the agents will reduce more faster the Health of the breaching Abnormality or panicked employees. In the latter case, this may lead to killing the employee instead if various employees are suppressing the same panicked employee at the same time. This value can only be see when selecting an agent to suppress an Abnormality or other hostile employee.
Armor[]
Armor could be consider as the amount of 'Defense' of the agent. This value reduce the amount of Physical Damage received of other Abnormalities when suppressing them and of others employees too, under possessions or under panic response: Murder. This can be increased by equipping shields or by upgrading the Physical Training research. This value can only be see when selecting an agent to suppress an Abnormality or other hostile employee.
Energy Gathering[]
Energy Gathering is a hidden value of the agents, which can be increased by traits. This will increase the amount of energy produced when ending a successful work with an Abnormality.
Abnormalities[]
Abnormalities have different type of stats, more about its containment instead than of them escaping or fighting. Some of these stats may stack up with similar stats of the agents. There's 7 types of stats: Mood Status Gauge, Energy Production, Health, Damage, Work Success Rate, Mood Decrease and Basic Mood Rating.
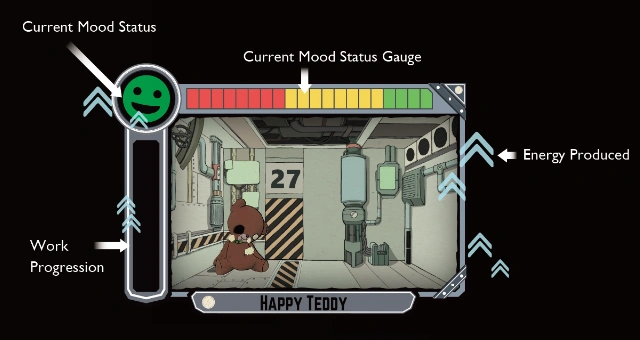
Abnormality's Containment Room Info
Mood Status Gauge[]
The Mood Status Gauge, Mood Gauge or Mood Status, is a way to measure how a specific Abnormality feels. This gauge appear at the top of the containment room of each Abnormality and come as a bar divided in minor ones, each bar represent 5%, with a total of 100%. The gauge is divided in sections of 3 different colors, representing respectively: Red ('Bad'/Distressed), Yellow ('Normal'/Neutral) and Green ('Good'/Happy). Not all the Abnormalities may include all the status. An icon at the top left side of the containment room show its current mood status. In each mood status, the energy produced may change and they will react different in each state, like triggering abilities, become harmful, escape or unlock special works to be performed. The Mood Gauge start in a specific mood in each new day and slowly decreases when no works are being performed with them, but with other Abnormalities, this increases instead. Both of these status can be changed with higher Observation Level.
Spider Bud's Mood Rating at its Best
When the Mood Gauge is totally depleted, most Abnormalities trigger their own abilities or when they remain in a bad mood for too long. When their Mood Gauge reaches its maximum amount, it will remain in 'Mood Rating at its Best' mood, for an amount of time. In this mood, Abnormalities will produce extra energy and doesn't need any attention, since their mood doesn't decrease. Once the time runs out, their mood will return to its Basic Mood Rating.
Works are the main tool to increase, decrease or stop the changes of the Mood Gauge of an Abnormality. The changes of work are applied once the work finished or is interrupted.


Type of Mood Status and Energy Production
Energy Production[]
The Energy Production is the way to measure how much energy an Abnormality can produce in different mood status. Abnormalities can produce energy, drain them or don't produce any energy at all, depending of their mood. As long they remain in a specific mood, their energy production will be of that type, increasing or decreasing as time passes, taking around 10 seconds. The amount of energy produced can be classified as 'Moderate', 'Large' and 'Largest' or 'Most'.
The energy is stored in a green bar if is increasing, until it reaches its max. The player must gather enough energy from the current day's goal to pass to the next day. When the bar is full, there will be a short moment of 'refinement'. White bars will slowly start to appear on the bar until is filled by it, and after 10 seconds, the day will end successfully. If the production of energy is negative, the bar will start decrease until the production changes or reaches the bottom, back to zero. When the production becomes negative in the refinement, the white bars will start to disappear too, slowly, until the energy is full again to proceed with the refinement again.
The energy production of some Abnormalities may get a short boost when performing a specific work. Example: Successfully finishing Happy Teddy's special work, 'To hug'. The Energy Production get a temporal boost when an Abnormality is in 'Mood Status at its Best'.
Health[]
Like the employees, the Abnormalities also have Health, and its bar can only be seen when the Information Function Research is implemented and they are escaping. The Health bar appear below the breaching Abnormality. Once their Health is depleted, the Abnormality will be defeated and will return to its containment room after a short time.
Damage[]
Abnormalities' damage is determined by their Damage Type. When in containment, if an agent fail while working, it might receive a specific type of damage: Physical, Psychological or Compound Damage, depending of the Abnormality and its mood. When escaping, the amount of damage that they deal isn't specific but rather appearing as 'Minor' or 'Strong'. The type of damage will be 'Physical' or 'Psychological'. The Abnormalities can deal damage constantly to a single or multiple targets once escaping. They may also deal damage when using their abilities.
Fear Level[]
Fear Level is only for breaching abnormalities, and this stat can only be see when suppressing them. The Fear Level represent the amount of psychological damage dealt constantly to the nearby employees, from 0 (No damage) and increasing in value. Clerks tend to panic almost instantly when meeting an abnormality of Fear Level 1 or higher.


An agent working with All-Around Helper
Work Success Rate[]
Work Success Rate starts as +0%, but can be increased with each Observation level. This value increase the chances of an agent successfully complete a work with the specific Abnormality. This value can be see in the Abnormality Codex or Encyclopedia. This value can stack up with the agents' Work Success stat.
Mood Decrease[]
Mood Decrease starts as -0%, but can be increased with each Observation level. This value reduce how fast the Abnormality's mood will be decreasing overtime. This value can be seen in the Abnormality Codex or Encyclopedia.
Basic Mood Rating[]
The Basic Mood Rating is defined by a percentage. This amount will define the starting Mood Gauge state of the Abnormality in a new day and after 'Mood Rating at its Best' ends, it will return to this value. This value can be see in the Abnormality Codex or Encyclopedia.
Trivia[]
- Don't Touch Me has clear 0% values in Work Success Rate, Mood Decrease and Basic Mood Rating, in all the Observation Levels.
- When a breaching Abnormality is defeated, it will turn in a small egg, which seem made of flesh and has multiple eyes on it (Similar to Nothing There's cocoon form). After a short time, the egg disappear and the defeated Abnormality returns to its containment room.
- The Queen of Hatred, Big Bird and Scorched Girl are the only ones who have an unique appearance when this happen.
Facility X-394 (Legacy)
| |
|---|---|
| Mechanics | Challenge Mode - Daily Cycle - Damage Type - Employees - Equipment - Hiring - LOB Points - Ordeals - Panic Level - Research - Stats |
| Departments | Control Team - Information Team - Safety Team - Education Team - Central Command Team - Disciplinary Team - Welfare Team |
| Characters | X - Angela - A - B |